Wednesday 18 June 2014

My craft room

This is the place which gives me utmost confidence , enjoyment and satisfaction..
Wanted to share few pics of my craft room..,
Hope u like it :)


Treat basket

Well now it's my turn ...to create a 3d thingi ...
I made this basket which I covered with wooden print paper planks and embellished with few flowers and leaves.
I folded a paper from the stack and made it appear like a napkin peeping out....
Cute na!


 a nice way to present hand made chocolates or Mithai to our near and dear ones….


List of Supplies used:
6. Brads, ribbon and lace from stash.
8. Copic markers 


Lots of love 
Arjita 


The prima dolls-cc tutorial

Hi friends..
I am sure you all must be creating wonderful projects with your own WRMK punch boards  after seeing all the amazing creativity and reviews done by my design team mates  …they have become irresistible. So what are you still waiting for…... hurry up and grab one for yourself.

Though this month we will be focusing on the various kinds of boxes,envelopes, and other 3d projects we can create, its equally important to know how to jazz them up and take your simple box or bag to next level of customisation and creativity.

I have a secret to tell you all……………………..i am in love!!!
❤️❤️❤️❤️❤️❤️❤️❤️❤️❤️❤️❤️
I am madly in love with the adorable  PRIMA DOLLS!!!! :)
Guys I can't tell u how versatile these stamps are and they can do magic to any project.
Its always fun to use them in tags, mixed media projects and even on paper bags.
I use almost every way to colour them like water colouring , copic colouring and paper piecing.
Water and copic colouring is indeed a beautiful way to make the dolls pretty but today i will talk only about PAPER PIECING  the dresses of the Prima Dolls.
Guys I can assure u it's super easy and will b super fun too.
so lets get started….
#1
Stamp the prima doll with black Memento Tuxedo ink on a white card stock.
Fussy cut the doll carefully.


#2
 Stamp the doll on a patterned paper of your choice.
Multiple colours can also be used.
Cut the portion of the dress neatly.


#3
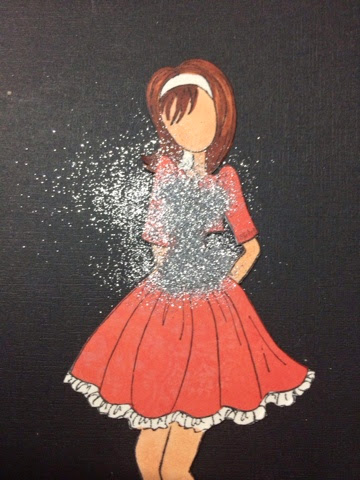
Colour the hair and body  the way u want to. I used my copics to do the same. Stick the dress on the doll by carefully aligning it.

#4
Add glitter to jazz up the dress and the doll is ready to be placed over the paper bag.


Here is the look of the project I made using this doll.

Another example using two patterned papers ...
And the finished project....

Hope you liked it and I am sure u all will give it a try...

There is a good news that we have the latest Prima doll dies in our store which can make the entire procedure fuss free and much more quick and easy .

List of supplies :
Patterned papers
Prima dolls-Bolero sweater
Prima Dolls-Strapless Dress 
Tombow mono liquid glue
Foam tape
Ribbons and pearls form stash

I am also looking forward for the stunning 3D projects you all are creating for our current Crafters Corner Challenge #15- GO 3D
Please send them before 29th march 
so that u can win the gorgeous prizes.

Please feel free to put in ur queries and I will b happy to answer them .
Lots of love
Arjita 

Party favours

Hi crafty people,
This is Arjita and it's my time to share an inspirational post with all of you...
This post is very special to me because I designed these party favors for my daughter's birthday.
I wanted to keep it very girly so sticked  to her favourite colour .......yes you got it right .....its a PINK.
I created the candy box with the amazing WRMK candy box punch board and trust me guys it was so easy and quick.
The uniformity and the professional finish can only be achieved by this punch board. 
I made two sizes one for the candies and the other for holding few adorable stationary for the kids.

I used patterned papers by DCWV and some bakers twine to tie the box and loads of embellishments to jazz up the project. Can u see the mini Tilda and the tiny hidden butterfly ? The Tilda was coated with crackle accents to create that distressed look. ... Isn't it cute ?
A closer look for u ...


I filled in some wooden balls for photography purposes so that you can see the window I created using some thick acetate.

For this box I created a wreath around the hero arts stamped image and added a butterfly also from hero arts.

 I wanted a matching invite so I decided to used this absolutely gorgeous die from joy craft to create the frame for the Tilda to fit in. The mulberry flowers, charm and pearls make everything so adorable ...

I just layered the similar pp on a black card stock and used few pop dots to create a dimension finally glued the leaves, flowers and other emblliez.

And the final pic for this post ....


The supplies I used are :
Mini Tilda stamp
Copic markers

Gosh !!!! They were quite a few tools here and I am so happy to tell you that our store is loaded with all these amazing stuff ...that's why I always sayCrafterscorner is a paradise for all the people who wanna tickle their desires of crafting.

At this point I  want to remind you once again to participate in our challenge #15-
GO 3D hosted by me. Guys u still have 4 more days and I will b super happy to see your amazing entries.

signing off for now…….
Hope u liked my post for today and will give it a try soon.
Lots of love 
Arjita 

Melt Art mixed media canvas


Hi friends ....
The weather is getting so hot ...and I actually took inspiration by the heat which is melting everything around us....lol
Yes ...I will be talking about Melt Art this time and few ways UTee can b used to create a wow effect in projects.
I love experimenting with my tools and products and this time it was UTEE .
According to me the 3 most essential tools needed to work with UTEE are:
1.Melt pot
2.Craft sheet
3.Spatula( comes free with melt pot)
Guys take my words there is nothing much more safer and appropriate than these tools if u wish to try hands on Melt Art.

I preped this canvas with coating it with gesso and distress paint. Added a tint of walnut stain to make it look a lil weathered.

The focal point had to be the Life quotation which I stamped in black ink and distressed it with vintage photo.
Then began the fun part ...
Melt the clear UTEE in the melting pot and pour it over the quotation. Immediately put the piece in freezer and the pretty cracks will appear in no time.
I loved the cracked glass effect and placed it right in the center and embellished it with mulberry flowers and leaves.


Look at the gorgeous cracked glass effect u can create ....

I also dipped the leaves and mini roses in the UTEE and they got the cool glassy look.


There was nothing much needed in this project as the focal point was so pretty and attractive I just placed few flowers and chams here n there to complete and balance the final canvas.


Also made a matching card and it looks like this...


Friends don't b sacred of this art form and do give it a try...... Just keep safely the first priority as it involves a lot of heat and molten material.
I will b super excited to see all what u create ....


That's all for today..
Hugs 
Arjita 

List of supplies:

Heat it tool
Pearls and ribbon( from stash)
Martha Stewart punch
Black and craft card stock

No line colouring -cc tutorial

I love magnolia's Tilda because of her innocence and sheer cuteness. It's actually very easy to colour her in with alcohol markers but I wanted to try few techniques with more affordable and available colouring tools.

No line colouring is the new buzz and as I said its easy to do it with copics.
All u need to do is stamp the image with a very light inkpad instead of black and do the rest of the colouring.

I did the same technique using distress markers and I was very happy to get similar results .

Today's tutorial is a picture heavy post so sit back and follow me....��

Step 1- stamp the image with desert sand ink on a water colour paper.
(Guys please zoom in to see the impression ..it's there....lol)

Step 2-  with the help of a thin brush colour all the skin with Tattered rose .
Use inward stokes so the colour lightens up towards the nose.

Step 3- add the pink blush on her cheeks with spun sugar.

Step 4- colour the hair keeping in mind her curls and shadows.


Step 5- colour the dress with two shades of purple. Add pumice stone for her pants.

Step 6- add black soot to add more depth in her pants and chef cap.
  
Colour the shoes with vintage photo.

Step 7- finally do the cake

Gr8!!! It's done .... Wasn't it easy friends?
To bring some glow and interst I added few faux stitched lines with white gel pen and wink of stell over her cap , shirt and cake. 
But then as usual I wasn't satisfied ��and I loaded it with glossy accents and my latest black enamel accents (by ranger) for her eyes.

Here is the final card I created using this adorable image ...


Happy crafting!!!
Love
Arjita 

List of supplies :
Tombow multi glue
Magnolia doily die
Brustro water colour paper

Fussy cut masking -cc tutorial

Hi crafty people,
Hope you all are creating awesome projects which makes all of us happy and stress free!!
This month we are researching on various stamping techniques few of which will be the old classic ones and few will be new and surprising !
My post for today mainly focuses on "masking" stamps which can create layered 3D impressions. Usually I mask my favourite girl " Tilda " with pretty backgrounds and  I call that"Basic Masking "
But today I m attempting a next level of masking which we will call " Extreme masking "
So without any delay lets begin this picture heavy tutorial with few instructions wherever needed :)

I am trying to create a floral arrangement using various stamps and believe me u can do a similar thing with stamps in your collection.

Step 1: stamp the first image ( the one u want on top) with black ink 


Also stamp it on a post it note to create a Mask. Fussy cut the mask very carefully.


Step 2: place the mask over this to completely hide it . Now take next stamp u wanna layer behind . Stamp it .


Now keep masking and stamping the next images till u r happy with the outcome. 


Step 3: at this stage I decided to stamp the pocket watch to complete the arrangement.


And here is the result…isn't it pretty?


Step 4: colouring with copics or other medium ….


Guys I am sure u all will give it a try and the results will be mesmerising !!!
I pasted this panel on a journaling book cover and will send it out as a present to a very dear friend of mine...☺️

Here is the final pic ...
Please feel free to ask any questions about this technique and I will b more than happy to help u  !
All it needs is practice and a collection of few beautiful stamps .
Have a great day !!!
Hugs
Arjita ��